Sunday 23 September 2012

Easy Apple Pie

My family and I love sweet and crunchy red apples. Hence, there is always apple in fridge.

But... there is one small problem. If I did not cut and serve the apples... there will be "forgotten" in the fridge and over time became a bit soft.

Throw them away? No, I don't do that and I have always taught my children not to waste food, any food, especially rice.  There are many many unfortunate people out there in other parts of the world that don't even have food.

You can now turn your soft apples into a nice and quick dessert. I have made this a few times and each time, this dessert moves so fast that I don't really have any opportunity to take a nice picture of it.

Total prepare time, depending on your cutting skills :)  I would say around 8-10mins. Total cooking time about 20 mins. I ever baked this after our dinner at around 8pm!


What you need

2 red apple
1 sheet of Puff pastry *
20ml lemon juice
10g brown sugar
A pinch of Cinnamon power (optional)
10g Butter (not too soft/ cut into small dice)

Methods

Pre heat over to 170C
Peel and cut the apple into half or quarter (but not too small) remove the core and seeds
Slice the red apple to long thin slices like what you see in the picture and place them it a bowl
Add the 20ml lemon juice, 10g brown sugar, cinnamon power into the apple and give it a good rub. The lemon juice not only gives the apple pie a nice flavour but will also prevent the apple from oxidising
Take a sheet of Puff pastry out from the pack direct from the freezer
When the puff pastry is a little soft, divide into 4 equal pieces, place them on a baking tray with some distance apart.
Line the apple slice nicely on top of the puff pastry. Finish all the apple slices on the 4 equal pieces
Top the apple pie with the pre cut butter dice
Bake in the oven for 20mins. 
Leave the apple pie in the oven for another 5mins before removing from the baking tray
Serve warm with vanilla ice cream or eat it on it's own

I hope you will try it


Note:
*
I bought this Pampas brand Puff pastry from Phoon Huat. It is also available at Cold storage. Or you may use any brand puff pastry for this.
Do not take out the puff pastry too early and only take out the exact quantity. Once expose to hot weather, the puff pastry will be very soft and may be difficult to handle

Tuesday 18 September 2012

Orange Cake with Orange marmalade

According to source from the Internet, Orange is the most commonly grown fruit tree in the world.

Orange is nice on it own as a fruit or fruit juice, it is also rich in vitamin C. Orange can also be used in cooking. Orange can also be used in aroma therapy oil.

I have made this Orange Cake a few times. This cake has a very nice smell and is soft and sweet. It taste even better if you add in the Orange marmalade, it gives a little texture to this cake.

But again, I made them in small muffin cup to reduce the baking time. Small muffin cup is also more presentable when you give them away.


What you need

150g unsalted butter, soften*
180 Caster sugar
4 medium eggs (lightly beaten)
grated orange zest from 2 oranges
250g self raising flour (sifted)
120ml freshly squeezed orange juice
2 tablespoon full of Orange marmalade (optional)

Method

1. Preheat oven to 180C. Grease and line a 21cm oblong cake tin. I line 12 big/ 24 small muffins cup.
2. Use an electrical beater, cream the butter and sugar till light and fluffy.
3. Add in the beaten egg over 3-4 times. Beating thoroughly after each addition.
4. Add in the Orange marmalade and beat until combined. (omit this step if you are not adding)
5. Add in the 2 orange zest and mix well with a spatula.
6. Using the spatula, fold in sifted flour, Stir until just combined
7. Slowly mix in the orange juice and stir until the mixture is well Incorporated and smooth.
8. Spoon mixture into prepared tin, smooth surface. Bake 1 hour or until skewer comes out clean when inserted in centre of cake. Leave cake in oven (power off) for another 5  mins before turning onto a wire race to cool.
or

8. Spoon mixture into prepared muffin cup. Bake for about 15 - 18mins in big muffins cup or 10 -12 mins on small muffins cup or  until skewer comes out clean when inserted in centre of cake. Off the oven, leave the cake in the oven for another 5mins before removing muffins cup from muffin tray.

Note:
* if you do not have unsalted butter, salted butter is fine too

Monday 17 September 2012

Fried Bee Hoon (Chinese Glass Noodle)

What? You must be asking "Who does not know how to fry Bee Hoon? "

No, today I am not going to share with you how to fry Bee Hoon.

I am sharing with you a tip to get Bee Hoon that is "Q" ie springy and you do not need to put a lot, a lot of oil to fry it to prevent it from sticking to your frying pan. And thereafter add lots of water to make sure it is well cooked.

Sound good right? Again, this is easy to achieve.


What do you need

A big pot
Water (enough to cover your dried bee hoon)
½ packet of Bee Hoon (the portion is up to you)
Another empty pot with lid

Method

Fill the big pot with water, bring the water to boil.
Put the Bee Hoon straight from the packaging into the pot. (Yes, you do not need to pre-soak it)
Cook the Bee Hoon in the boiling water till soft
Remove the Bee Hoon from the boiling water and put them straight into the empty pot. Cover the pot with the lid and let the Bee Hoon rest inside for about 10 mins. This step will keep the Bee Hoon moist and Q (spongy).

10 mins later, your Bee Hoon is ready to be use for frying.

Remember, you do not need to add a lot of oil.  You only need oil to fried your garlic, ingredients and add in the Bee Hoon last. When the Been Hoon is well coated with the seasoning (ie you don't see any white Bee Hoon) your Been Hoon is done.

See my fried Been Hoon below :)


Sunday 16 September 2012

Peanut Butter Banana Cake


Have you ever ended up buying some food item such as mayonnaise, jam, peanut butter in a larger capacity because the price for the large ones and the medium/small one is only 50cents different?

I have a big bottle of peanut butter about 800g in my kitchen which was bought because of the 50cents :)
This peanut butter is moving very slowing as my kids prefer to eat the apple jam and mango jam that I have made.

So, in order to "move" the peanut butter faster, I search through my old cookery book and found this "Peanut Butter Banana Cake" receipt.


This cake is very nice, you can chew on the crunchy peanut, can smell the sweet banana while you were eating it. It smells very nice even before it was bake due to the peanut butter.

The receipt suggested to make this cake in a 21cm oblong cake tin and the baking time is 1hour!!!

Cannot lah. Singapore electricity is so expensive. So I decided to bake this cake into small muffins cup. And the cooking time is only 10mins for 21 small muffins cup. Plus, I can give some away without having to cut, pack...

Here is the receipt:-

125g unsalted butter
1/2 cup soft brown sugar
1/4 cup honey
2 eggs, lightly beaten
1/2 cup crunchy peanut butter * 1
1/4 cup wholemeal flour *2
1 & 3/4 cup self-raising flour *3
1 cup mashed banana *4

Methods:

Preheat oven to 180C. My oven only have 175 C.
Brush a deep 21 x 14 x 7cm loaf tin with oil. Line the base and sides with paper, grease the paper.
Or line your muffin tray with muffin cup.

1. Using electric beater, beat butter, sugar and honey in a large bowl until light and creamy.  Add eggs gradually, beating thoroughly after each addition. Add peanut butter, beat until combined.

2. Add banana, use a metal spoon, fold in sifted flour, including husks. Stir until just combined and the mixture is almost smooth.

3. Spoon mixture into prepared tin, smooth surface. Bake 1 hour or until skewer comes out clean when inserted in centre of cake. Leave cake in tin for 10 mins before turning onto a wire race to cool. Serve sliced and speed with butter, if desired.

0r

3*  Spoon mixture into prepared muffin cup. Bake for about 10mins on 175C or  until skewer comes out clean when inserted in centre of cake. Remove muffins cup from muffin tray immediately.

 * Notes
1) Original receipt call for 1/3 peanut butter, but since I don't have this size plus I love peanut butter, so, I use 1/2 cup. I love peanut butter

2) & 3) Flour - original receipt call for 2 cup wholemeal self-raising flour. Since I don't have, I mixed wholemeal flour and self-raising flour.

4) use soft, very ripe banana for this cake.  Mash them with a fork.

Let me know if you have any questions

Saturday 15 September 2012

Lemon Grass Green Tea


Don't really like to drink plain water?


Would prefer drinks with flavour? Something low fat?


Well, you may want to consider try this - Lemon Grass Green Tea


Lemon Grass has many benefits and is commonly used in cooking.  Google to find out more about it yourself ok?

Have you ever try it in your drink? It's very refreshing! You can drink it cold on a hot day or hot what you want something soothing. And the biggest attraction is: it's easy to prepare! 

What you need:
A large pot
2 little of water
3 - 4 stalks of lemon grass
2 green tea bag (any brand)


180g - 200g Sugar (depending on individual, I didn't add)
or Honey (can add to the drink when you are drinking)

Method

Cut the lemon grass diagonal, by cutting diagonal, you are able to release more flavour from the lemon grass.

Remove the paper tag from the tea bag as this tea bag is going into the water

It a large pot, pour the 2 little of water in it. Place all the lemon grass, and the 2 green tea bag into the pot.
Bring the water + lemon grass + green tea to boil. Let it boil for 5 mins. Off the fire and let the lemon grass and tea bag soak inside for another 5 mins.

Sieve the drink into a tea pot or jar. You can serve it either hot or cold

I had mine with the Lemon Honey I made.


Thursday 13 September 2012

Egg Frech Toast

Do you have left over bread that turns a bit hard?

Well, you can turn them into delicious French Toast..

Plus

How about the idea of training your child to do simple "cooking" when they are small?

If you have small kids, ask them to help! This recipe is easy and delicious.

What you need :

Milk (15ml)
2 Eggs
8 slices Bread
A pinch of salt
Oil for frying the bread

To serve
Maple syrup or chocolate syrup and butter

Method
First, beat the egg, then add in milk and salt and mix well.
Heat up a non-stick frying pan.
Use a tongs to pick up a slice of bread, dip the bread into the egg mixture and make sure the bread is well covered with egg mixture.
Place the bread gently into the frying pan.
Check, with the bread turn slightly brown, filp the bread over and cook the other side.
Repeat and cook all the bread.

Serve it while it's warm!

Wednesday 12 September 2012

Honey Lemon ^ ^


Sweet + Sour = Perfect match!

I saw this from a Chinese blog and decided to give it a try. Ever since i started making this, there is always Honey Lemon in my fridge :)

Why make this? Oh, it's so easy to make.

Why drink this?  Some benefits such as, whitening of our complexion, Vitamin C. You can find lots and lots of other benefits from the Internet.  Plus honey is a natural sweetener. So on a hot sunny day, would you not prefer a healthy Ice Cold Honey Lemon over a soda that is infused with sugar that will add calories into your body?

Below is how it is made:-

What you need:-

2 lemon*
Honey (I use honey from Australia)
1 Glass bottle (clean and dry/big enough for 2 lemon and the honey that you are going to add in)
A tablespoon

Method

Wash and dry the skin of the lemon with kitchen towel.  Make sure the skin is dry and no water on it.
Slice the lemon into thin slice about 2-3 cm thick
Pour a tablespoon of honey into the glass bottle, place a slice of lemon into it.
Pour another tablespoon of honey on top of the lemon that you have just put it, top the top with another tablespoon of honey. 
Keep repeating the honey, lemon, honey lemon until you have finish all the lemon slices.
Top in more honey over the last slice, make sure that the lemon are fully immersed in the honey.
Refrigerate the honey lemon for 3 days.
Invert the bottle at least once a day for the honey and lemon juice that was released overtime is well Incorporated.


To serve

Simple use a dry and clean tablespoon to take out 2-3 slices of lemon with the honey and make a cup of nice drink. If you prefer a sweeter drink of course you will take more honey out from the bottle :)

* I would suggest to make 2 lemon each time as you need 3 days each time you make this. So try to do 2 lemon today and another 2 lemon 2 days later. By do so, you will always have Honey Lemon in your fridge.

Tuesday 11 September 2012

My love for Sushi??!


I love Sushi!

I love sushi because I love to dip my sushi in the wasabi + Japanese soy sauce!

So actuall I love sushi or I love wasabi with soy sauce?

I am confused too @ @
                                0

Dinner today at Sushi Tei.  Most are sashimi sushi except the one one the top left! Fried Tofu skin with mashed tuna. I personally do not like tuna.

So in order to eat it, I top it up with lots of wasabi and ginger.


Monday 10 September 2012

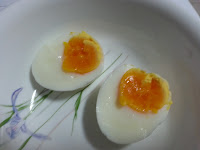
“Hot spring” egg 温泉蛋


“Hot spring” egg 温泉蛋

Look at this picture! Does this egg look familiar? Yes, usually you will get this egg when you order a Ramen from a Japanese Restaurant.


You will need 4 eggs (up to you)
1 deep pot
Salt (1 table spoon)
Another deep pot filled with tap water

Method:

Place your egg (either room temperature or from the fridge) into a deep pot. Fill the pot with tap water until over the egg. Add in a table spoon of salt. By adding salt will stop the egg white from flowing out should the egg shell crack.

Place the pot over low heat . When the water beings to bubble, turn the fire into medium and cook the eggs for another 4 mins.

Once times up, remove the egg immediately from the hot water and place them in the other deep pot that is filled with tap water. This will stop the egg from continue cooking.

When the egg is cold, shell the egg and cut it into half and you will get the above!

If you prefer to have 卤蛋, then you will need to pre-boil some rock sugar, black sauce, star Anise and cinnamon stick and if you like, a green tea bag.  Let it cool before you place the egg into over night in the sauce. By doing this you will achieve a卤蛋 with not a hard boil yolk the Japanese style.

Steam Milo Pudding


Steam Milo Pudding

Yes! Milo Pudding! How do you like the idea? I simply love it..


Make 6 small pudding cup ( I got my cup from Daiso @S$2 each)

Milo powder 100g *
Sugar 1 table spoon
2 large egg
Milk 400 ml
Vanilla essence 1 teaspoon or Rum 1/2 teaspoon (this will take away the smell of the egg)
Method:

1          2 egg + sugar into a large bowl, mix it well with a hand whisk and set aside
2.         Pour 400ml milk + vanilla essence + Milo powder in a small pot, put on stove over low heat for about 3-4 mins .(Can feel it by putting your finger in the milk.) Milk should feel like shower water temperature.
3.         Pour warm milk into egg mixture. Pour slowly and stir the mixture at the same time until both egg & milk are well incorporated . (this is why you need to place egg mixture in a large bowl).  
4.         sieve the egg & milk mixture (this step will sieve out the transparent egg white)
5.         Pour egg mixture into the 6 pudding cup and cover with either aluminum foil or cling foil.
6.         Prepare your steamer and bring the water to boil.  Place the 6 cup into the steamer and steam over medium fire for 10mins.  
7.         Off the fire but keep the 6 cup in the steamer for another 10mins, then you bring it out to cool.
8.         Refrigerate the pudding when it’ s cool.
9.         Serve with chocolate syrup or dust some Milo powder on top. Yum!

Note:
  • If you omit the Milo powder, this will just be a regular egg pudding. But I would suggest the you add 2 more egg yolk for a nicer yellow colour and more egg flavor. Serve with mapel syrup!

My 1st long overdue post!

I have been thinking of Green Tea Mocha for the whole day so I have decided to make these Green Tea Mocha muffin. Having been searching the web for the whole day, I have decided to come up with my own recipe based on the little baking experience that I have accumulate over the years. Although it was a little challenging, the outcome of these muffins were satisfying .

I had used instant 3 in 1 Green Tea Mocha mixed that my husband had bought for me from Korea.We baked the muffins using Happy Call Pan. You can also use an oven. My children loved it sooo much that they are bringing the muffins to school and share with their school mates during recess.

The colour of the muffins looked beautiful. It tasted and looked real good. The cake was moist and soft. Be sure not to on the fire too big as the based of the muffin might burn easily. This recipe is definitely a Keeper for me. For me,I used four packets of Green Tea Mocha i3 in 1 mix.

P.S.You can always substitute the 3 in 1 Green Tea Mocha mix with milk power and Green tea powder instead.

Recipe as follows:-

2 Eggs
150g sugar

220g self-rasining flour
1/2 teaspoon baking powder
5-8g green tea power
2 table spoon milk power
70 ml cooking oil

optional: 60g copped almond and rasins mixed (can increase to 80g by adding what you like most)